Saturday, October 13, 2012

Help me! I Want To Block All Apps, Ads, Games, and Websites on my Facebook


Over the past several days I have seen a lot of questions on how to remove and block requests from game apps used by friends on facebook. For many, the inundation is overwhelming when they log into their accounts and they have to sift through a barrage of Joe Blow wants you to play Tic-Tac-Toe with him. This tutorial will walk you through blocking all the apps at once. 


These screenshots are from my laptop. Look in the upper right hand corner of Facebook. Do you see the the drop down marker? You will click on that. I have circled it in red on the screenshot above. A drop down menu will appear after you have clicked on it.


The drop down menu will give you a short list of options. We want to go to our Privacy Settings. Click on it. A new  page will open up. I have put red lines by Privacy Settings in the screenshot above.


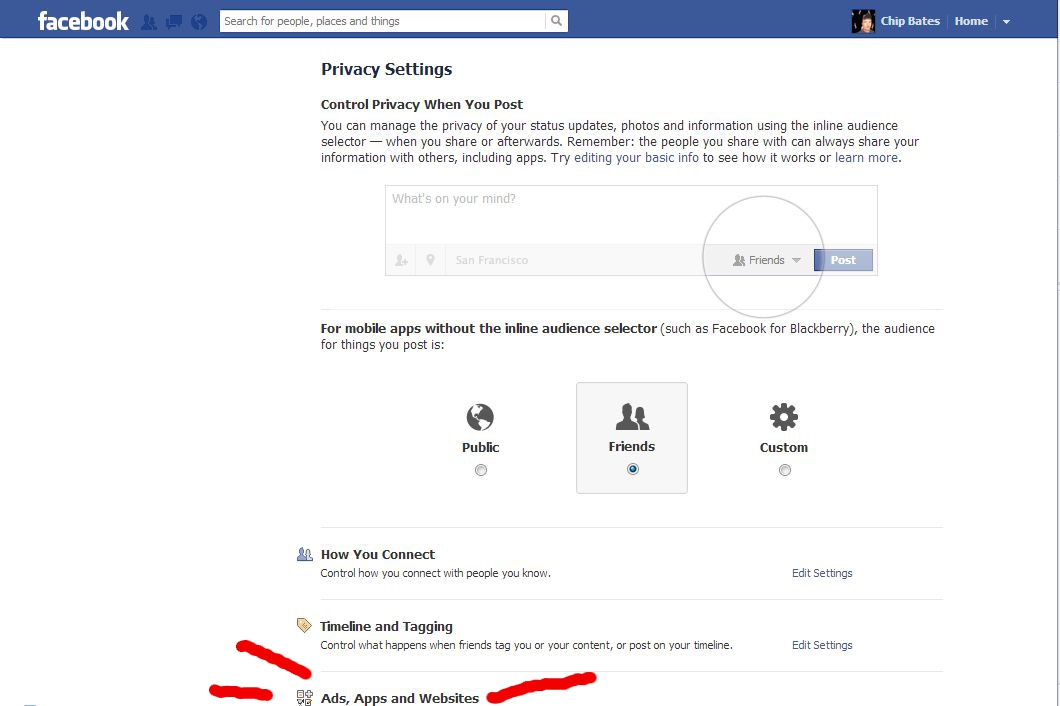
On this page we will want to go down to Ads, Apps, and Websites. To the right of it will be Edit Settings. Click on Edit Settings.  When you click on that another page will open. I have put red lines around Ads, Apps, and Websites in the screenshot above.


We are almost done. Look for Turn off your ability to use apps and click the words Turn off. A window will open in the center of the page. I have circled the section and put a green line next a red X in the screenshot above. You will find the words Turn off to the right of the red X.


Click on the blue box in the new window that says Turn off Platforms. This will keep games and apps from sending you messages about what your friend has won, requested, or wants you to join.

I hope this is of some help to those who were wanting to know how to turn off all app notifications one time. For those who wish to turn off notifications from a few select apps, I will post a how-to on that later in the week.

~ Best wishes - CB

Wednesday, November 9, 2011

Help me Chip! My Computer is Running Super Slow!! Part 2 Cleaning Up A Hard Drive Uninstalling Software

A poorly maintained hard drive can contribute to sluggish computer performance. Every so often we have go through the stuff in our homes and get rid of some stuff or reorganize it. The same thing is true with hard drives on computers. In this section we are going to go over how do just that.

First a little inventory of what you have on your hard drive may be useful. Are there programs you just don't use? Do you have tons of pics, music, or old downloads just sitting there? A lot of people do. I usually recommend to my clients if it's stuff you want to keep (pics, music, downloads, movies, etc) move it off your computer's hard drive and on to an external storage device (flash drive, external hard drive, dvd, cd, or the cloud.) Not only is it taking up valuable space, but if your hard drive ever fails and the only copy you have of your favorite song, picture, movie, or document is on it, you may or may not be able to get it back. We will cover moving files off the hard drive in a future post. Let's get started with the uninstall!

To uninstall software (programs) left click on the Start Button. A box will open up like this:


Control Panel is on the right hand side. Click on it and a window will open up like this:


On the left side of this window is the word Programs. Under it is Uninstall a program. Click on it and another window will open that looks like this:


It may take a moment for the list to fill up with all your programs. When it does scroll down and find the one you want to uninstall. In our example we are uninstalling AVG PC Tuneup 2011. Click on the program you are uninstalling. You will see a box that looks like this:


Click on yes. A box will open up with a green status bar to show the progress of uninstalling. If the box only appears briefly, don't worry. The next screen you will see is this one:


Click Ok. You have successfully uninstalled a program. Continue as needed if you have several programs to uninstall.


How Do I Use System Restore?


SYSTEM RESTORE

So what is system restore and why bother with it? Well, system restore is a quick fix of sorts that can be used to undo some software  (program changes), fix some problems that may have been caused by a download, or fix a change to the configuration of your computer. Hardware related stuff can not be fixed with system restore. One of the great things about using system restore is all of your documents (files like pictures, music, and word documents) remain intact!! Remember you can click on the pictures to enlarge them if need be, and we are working on a Windows Vista machine in our example

1. Click on the start button


2. A box should open up that looks like this:


3.  Click on Control Panel. In our example it is on the right hand side third one up from the bottom. A window will open up that should look this:


4. We are looking for System Maintenance.  Right underneath it is Back up your computer. Click on that and another window will open up looking like this:


5. At the bottom it will say Use System Restore to fix problems and undo changes to Windows. Click on that. You should next see a window that looks like this:


As you can see there a two options here. You can use the last Restore Point or go to an older one. On my computer the system restore points are saved automatically when any software changes are made. 

6. In this example, I am going to use a slightly older Restore Point so I have selected Choose a different restore point. Click Next > after you have made your choice. A new window will open like this:


Now, from this list I have several restore points to choose from. Generally, I try to choose a restore point that was closest in date to whatever software change, driver download, or update was made. 

7. From this List I will choose the restore point Undo: System Restore. (In this example, I am undoing a System Restore.) The steps are the same no matter what you select from the list.  Click Next > and you will see a window like this open:


8. Click Finish. System Restore will close and you will see window open like this:


9. Click Yes. A new box will open resembling this:


This window may stay on the screen for awhile. Do not be freaked out. The computer is doing what it says: Preparing to restore your system. After a little while you will see another screen that pops up that says initializing. It will walk you through what is doing. Let it. Do not do anything to the computer. Then the computer will restart. This process may take some time again do not panic. 

10. After the restart, a window will be on the screen that looks like this:


11. Click Close and you are done!!

A couple of thoughts on System Restore: If your desktop looked different on the date you chose, then it will revert to whatever it looked like on that date. So, don’t freak. All your pictures, music, Word Documents, and spreadsheets are still there. These restore points are only good if they done prior to any changes in programs, updates, software installs, and what not. Any time you plan to do a change to your system you should Run System Restore and create a restore point so you can do undo any changes you made if you have to. Better , yet, your system should be set to do so automatically! They are not a fix all. However, they are handy for many problems caused by a driver download, update, or any basic configuration changes.

~  CB


Saturday, October 8, 2011

Help me Chip! My Computer is Running Super Slow!! Part 1

I get this call a lot. One of the first things I always ask is have you made any changes to your system ? It is pretty 50/50 on the answer. If your answer is yes (this includes downloads, updates, new software, and new hardware) we will cover the fix in an upcoming post. I will link the post here. If your answer is no, we are going to cover some basic places to start in this post.

Three of the very first things I always check on any computer are: the OS (what is it running: XP, Vista, 7, etc), what type of CPU does it have (how big is its brain), and how much RAM or memory does it have ( how big are its muscles). The reason I check these things is to make sure specifications for operating are up to par. In other words is the computer up to the job?


Here is how you can find out: (You can click on the pictures if you need to make them bigger.)


Left click on the Start button


A box will open that should look similar to this:


We want to right click on the word Computer. This will make a box open up that will look like this:


Left click on the word Properties and we will be rewarded with the information we seek in the form of a window like this:


In this example we can see the Processor/CPU  is running 2.00 GHz.  The RAM is 4.0 GB, and we are running Windows Vista Home Premium.

So what do we do with this info and why is it important? Well to begin with every piece of software (program) has a minimum requirement it needs from your computer to work in the way of CPU (brain) and RAM (muscle). What we are looking for here is to make sure your computer can run its operating system (XP, Vista, etc) with ease. You can find system requirements for operating systems here: insert link. Vista requires 1 GHz CPU, 1 GB of RAM, and a 40 GB hard drive with 15 GB of it free. WHOA CHIP!! I know we haven't gotten to the hard drive yet but we will in two paragraphs. What I want you to take from this part is in the example we have at least twice what we need and that is a very good thing. Our Computer is not struggling to "think" and is not straining to "lift" anything.

Let's say you find your computer is lacking in one of these areas. RAM is cheap by and large. I always recommend to my clients to consider upgrading to at least 2 GB of RAM if their systems are able to handle it. If their computers can handle 4 or 6 even better. A CPU can be a little pricier... a little trickier to install. We will post a video in the upcoming weeks on how to install RAM and CPU. A brain that can think faster and muscles that can lift more are always a good thing!

Now to the hard drive. I want you to go back to step one: Click on Start.  When the box opens up this time, left click on the word Computer. A window will open similar to this:


We are concerned with the Local Disk (C:) drive. All we needed was 40 GB with 15 GB free. I'd say we are plenty fine here. If you think of your computer's hard drive like the memory part of your brain, you might be able to understand why having plenty of space is important here. If you ran out of space to remember things, it might become very hard to get very basic things done. Tying your shoes for example may take 30 minutes instead of a few seconds. Worse you're entire body may shut down if it could not remember how to make you breath or make your heart beat. The same thing happens when a hard drive is full. Basic functions for your computer become very difficult. In the next part we will look at cleaning up hard drives to help speed up your system.

CB


Disclaimer

As with any help guide or advice, the reader takes full responsibility for any action he/she takes. While the information relayed here is accurate to the best of our knowledge we are not responsible for any outcome as we are not there to take part in the action.
There is a remote help icon on the left hand side for those who do seek/need help with their computer issues or the reader may contact me to make a house call to work on their computer. Please make available the make/model of your computer, operating system, and what your computer was doing right before the issue began.

CB